About one year ago, I decided to start taking some coursework in patternmaking and apparel construction. I was working on launching my brand and was hiring patternmakers and product development consultants to help get my ideas ready for production. Overall, I found this process very frustrating – hiring these people was expensive, the work was slow and often needed to be corrected, and ultimately the end result was never quite what I wanted it to be.
As is so often the case, I realized that if I wanted things done correctly then I would have to do them myself. I decided to invest the time and money I was spending on consultants into my own education – I already knew exactly what I wanted to make, so how complicated could it be?
The result has been deeply humbling, to say the least. My understanding of this industry is still quite limited, but it’s given me a perspective that I was lacking before. I’ve found myself using many of my analytical engineering and drafting skills, as well as improving my understanding of how clothing is actually sewn together.
It would be impossible to condense everything I’ve learned into a bite-sized listicle, so I’ve tried to highlight some of the points that I think will help the average menswear guy be more appreciative of garment creation and have more context of what goes into it. So with that said, here are just a few things I’ve learned after a year of patternmaking and sewing:
1. Everything is more complicated than you think it is.
I could summarize this whole article with just this point. I assumed that because I already knew a fair bit about clothing and how it should fit that I would have a good head start on patternmaking and garment construction. This wasn’t remotely true. Every aspect of the garment creation process – drafting, pinning, cutting, sewing, and so on – was (and continues to be) very challenging. I’ve gained so much respect for the people that do this professionally, from the product developers in the studio to the folks working on the factory floor. Even making “cheap” clothing requires a substantial amount of human effort and skill. Which leads to my second point…
2. Sewing is an art form.
Perhaps it’s because working in a garment factory is wrongly seen as “unskilled labor,” but I don’t think many people (including myself a year ago) fully appreciate how difficult sewing is. There are so many things that I just never thought about, and once I had to make it myself I realized that I didn’t even know where to begin. Have you ever thought about how zippers get attached to clothing? I spent two hours yesterday sewing a zipper into a dress and honestly, it looks like shit. Or how does that lining get inside of your jacket? Well, they have to turn the whole thing inside-out and do a lot of hocus pocus to make it come together. There are so many aspects of garment construction that seem simple until you think about what it actually takes to do it. The people that do this kind of work are generally very skilled, regardless of the labels on the garments that they’re working on.
3. It’s never as simple as “adding a half inch here”.
One piece of feedback I often see (and I’m very guilty of this as well) is folks saying something to the effect of “this product would be perfect if they just added a half inch to the rise” or “if the leg opening was a quarter inch smaller, that would be ideal” – in other words, suggesting tweaks to the fit as a way to improve the product. The issue is that, as I already alluded to, it’s not that easy. Adding or removing space to a garment is a complex undertaking, and changes to one part often reverberate throughout the entire piece. For example, did you know that the back panel of your trouser leg and the front panel are usually different sizes? This is because you have more mass on the back of your legs (that’s where your muscles are), so the back panel will be a bit larger to accommodate this. In other words, changing the shape of the leg isn’t as easy as adding or subtracting a small amount. This one adjustment will affect all of the major pattern pieces, so even the smallest tweaks can have significant effects.
4. Respect the grainline.
It’s easy to think about cutting pattern pieces like cutting cookies, where you have a big piece of fabric and just punch out the pieces you need. But there’s one critical issue that makes it much more complicated: grainlines. You’ve likely heard of warp and weft, the two thread directions in a piece of woven fabric. These are the latitude and longitude of patternmaking, and everything must be done with respect to these guidelines. It’s easy to think about when using patterned fabrics – it makes sense that all the stripes on your OCBD should be aligned with each other. But even with plain fabrics, the pattern pieces will look “off” if they’re not all oriented in precisely the same way.
Beyond this, though, it’s also important for fit. Fabric behaves very differently depending on its direction. With a standard woven fabric, there will be very little stretch in the warp (grainline) direction, while the weft (crossgrain) direction will have a bit of stretch. The bias (diagonal), on the other hand, will have a fair amount of stretch and can be quite unpredictable. By aligning the grain line with the vertical direction of the garment, we an give the horizontal direction a bit more”give” which will help with comfort and movement. Proper alignment with grainlines is critical for fit and appearance – it seems obvious now, but this is one of many things that I was oblivious to when I started.
5. Darts aren’t decorative.
A large aspect of patternmaking is manipulating fabric to transform it from a 2-dimensional plane into a 3D shape. This is done with a variety of shaping devices like darts, yokes, pleats, gathers, and more – these manipulations add or remove fabric in specific spots to help it conform to the body. While these tools can certainly be used for decorative purposes (the added fullness of spalla camicia comes to mind), they are often critical for fit. For example, the yoke on the back of your jeans isn’t just for looks – it’s there in place of the darts that are normally on your trouser seat. Because your waist is (usually) smaller than your hips, something must be done to make the fabric change in size. Shaping devices like yokes and darts allow pants to fit your rear while also fitting your waist. Again, it seems obvious now but I had no idea until it was explained to me. Which leads me to my next point…
6. Men have it easy.
Most of my coursework has been in women’s clothing, for two main reasons: first, it’s a larger market so it’s what most people plan to work on. But on top of this, there’s the more subtle point – it’s a lot harder, so if you can do women’s clothing you should be able to handle men’s with ease. Men’s bodies are much easier to fit because we have less curves and we generally don’t want clothing to fit as closely. For men’s clothing, much of the complexity comes from design details (like getting a shirt collar or jacket pocket juuust right). Although I doubt I’ll ever do any work in the womenswear realm, I’ve sure gained a lot of respect for it. Getting a stiff fabric to fit tightly on a woman’s body without pulling anywhere takes some serious skill.
7. Armholes are one of mankind’s greatest achievements.
I’m sort of kidding here, but only a little bit. Figuring out how to put a sleeve onto a top in a way that lets your arm move is like the clothing version of discovering electricity. There’s a reason that none of those historic garments (robes, togas, kimonos, and the like) had set-in sleeves – it took humanity thousands of years to figure out how to make armholes that worked. The magic of it is using two different curved shapes of different sizes, and sewing them together in a very specific way. Even when you’re looking at the pattern pieces, it makes no sense. How do these two totally different shapes go together? A key component is adding additional “ease” into the top of the sleevehead – in other words, the top of the sleeve is larger than the space that it’s sewn into (which is a real pain to sew correctly). The result is a garment that works so well that you don’t even notice how weird it is. So next time you slide into that chambray shirt, thank your ancestors for figuring out how to make it both comfortable and functional.
8. Fabric changes fit.
Again, it seems obvious but it often isn’t. Even after spending hours tweaking a pattern, changing form one material to another will alter the fit. Linen pants and wool pants made on the same pattern won’t fit the same. Keep this in mind when trying things on and don’t assume that everything will remain constant across a range of fabrics.
9. Make your peace with manufacturing tolerances.
Lamenting over variance between garments is a popular complaint in the menswear-sphere, and I can understand why. It’s frustrating when you expect something to fit one way but it doesn’t because something is “off”. But there are so many places in the process where deviations can occur that it’s simply not feasible to remove these variations entirely. Every step – drafting, cutting paper patterns, cutting fabric, sewing, washing – creates opportunities for changes to the intended fit. I’ve always been amazed at how much my garments can morph between these steps, simply because I wasn’t as accurate as I thought I was. The good news is that most manufacturing facilities are much more high-tech than me in my small living room, but understand that no process can remove these tolerances entirely.
10. Body measurements are only half of the story.
This relates to patternmaking, but I think it’s important to keep in mind in a world saturated with custom clothing at every pricepoint. No matter how accurate your body measurements are, it’s not a complete story of how well a garment will fit. If garments were made to the exact same dimensions as your body, everything would fit like a wetsuit (a wetsuit that you couldn’t even get on). The difference between your body measurement and the garment measurement is called wearing ease, and it’s where a lot of the nuance of patternmaking lies. It takes significant skill and understanding to know how much fabric to add, and where. So when giving your measurements to some online custom clothier, remember that they’ll still have to do this delicate conversion for you. And if their idea of a good fit isn’t the same as yours, you may not be satisfied with the end product.
A final note – if you happen to be in or around San Francisco, I highly recommend the classes at City College of San Francisco. If you’re a permanent resident of the city (like me), the classes are literally free. I spent some money on equipment and materials, but the courses were free and the instructors are excellent. I can’t recommend them enough. Just know that these aren’t rec center classes – these are fast moving, college-credit classes and require a lot of work. But the experience has been great and I highly recommend their classes. Feel free to send me an email with any questions about the program.
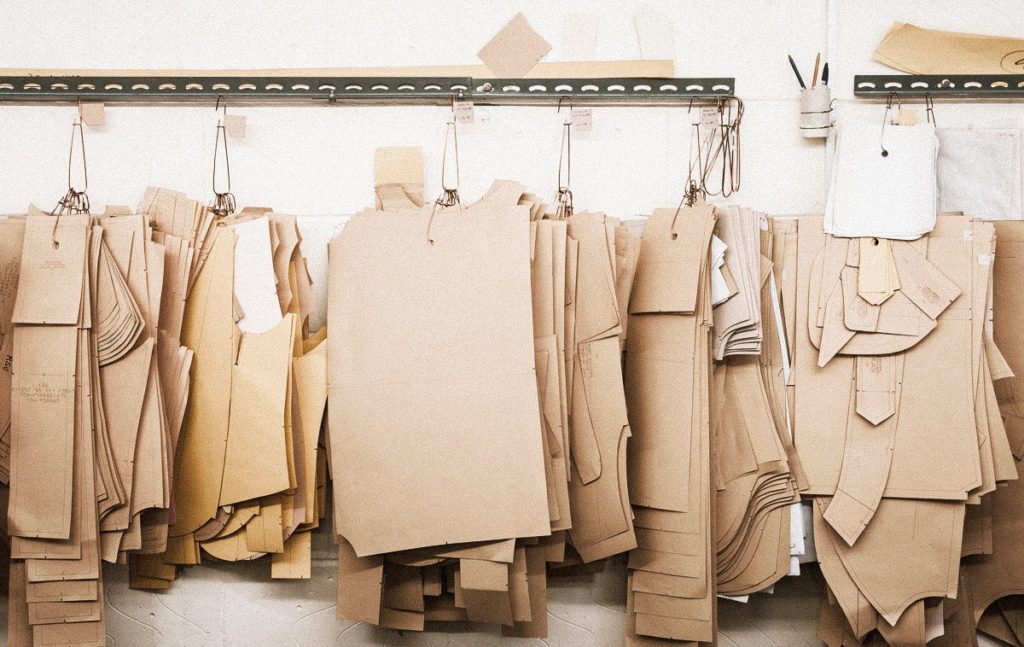
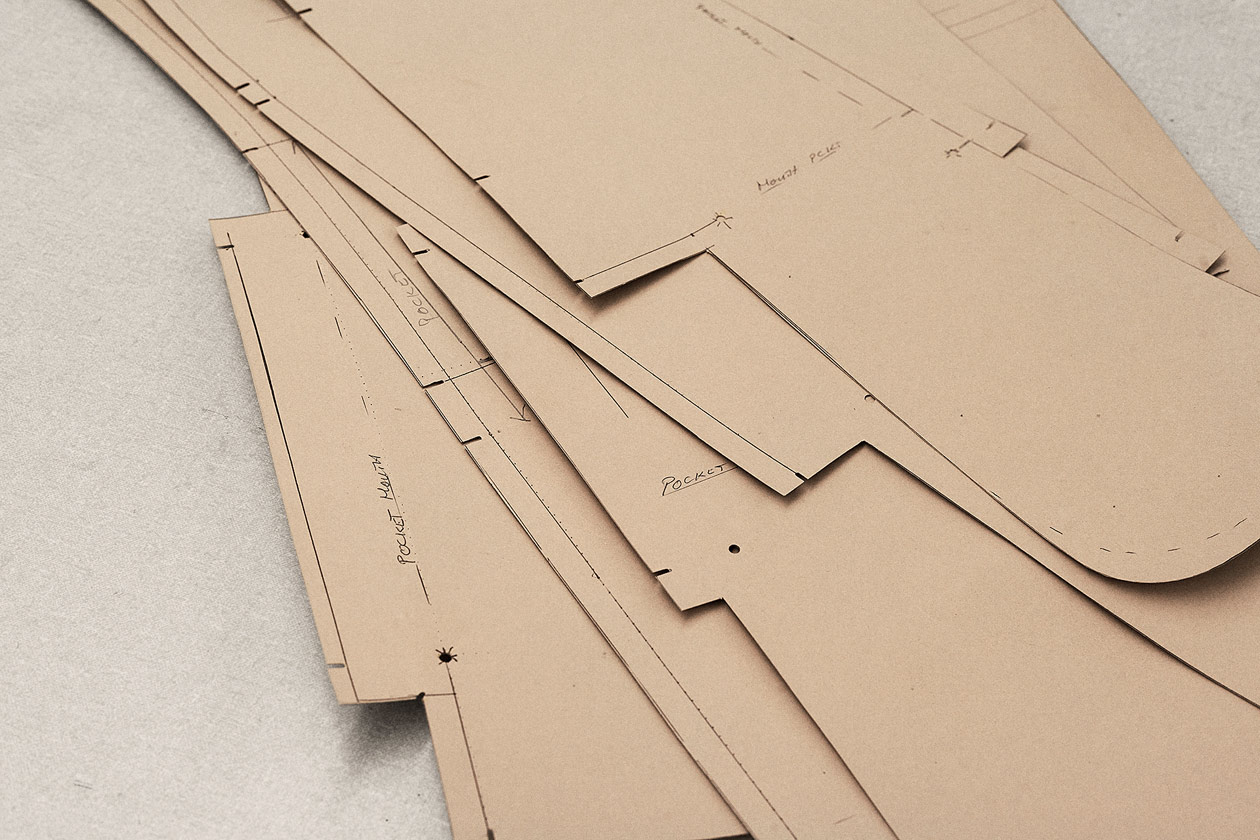
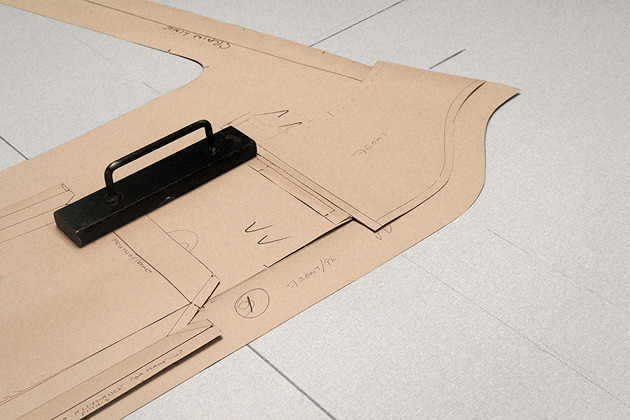
All images here come from S.E.H. Kelly, a wonderful two-person brand that is much better at patternmaking than I am. I can assure you that none of my patterns or sewn garments are photo-worthy – but I’ll get there eventually. If you want to see more, you can follow my Instagram – I often post stories of my works in progress.